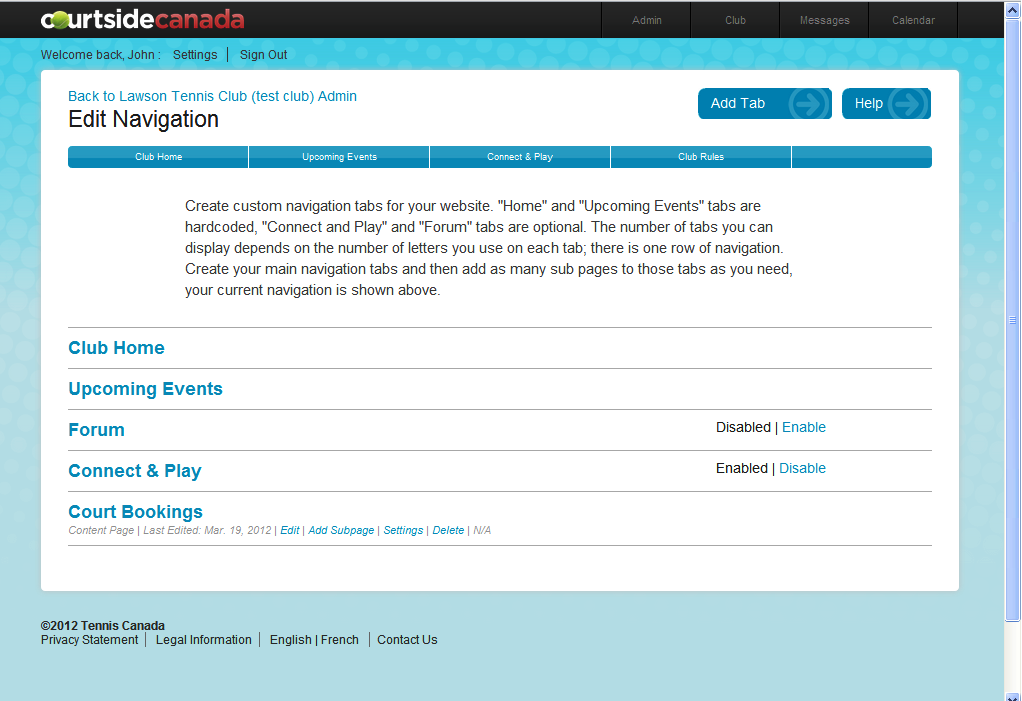
Monday, 26 March 2012

How to edit menu tabs and create subpages

Here are more suggestions on how to make Courtside Canada a better online home for your tennis club. In this article we list steps required to edit menu tabs, create subpages, and add a PDF or Word document to your club website on Courtside Canada.

Edit menu tabs


  1. Sign-in to your Courtside Canada account and click on “Admin” on the top of your screen.
  2. Click on the “Settings” tab on the far right-hand side of the blue menu items.
  3. Click on “Navigation Tabs” which is the last tab on the left-hand side of your screen that appears in blue then click on the blue “Navigation Tabs” button.
  4. Choose the tab that you would like to edit by clicking on the blue “edit” button associated to that navigation tab.


  5. Make the necessary edits to the navigation tab you have selected. Then click the red “edit page” button at the bottom of the page.


  6. The changes have now been made to your navigation tab. To check the changes click on “Club” on the top right-hand side of your screen and selected the navigation tab that you just edited.

Create a subpage

  1. Sign-in to your Courtside Canada account and click on “Admin” on the top of your screen.
  2. Click on the “Settings” tab on the far right-hand side of the blue menu items.
  3. Click on “Navigation Tabs” which is the last tab on the left-hand side of your screen that appears in blue then click on the blue “Navigation Tabs” button.
  4. Choose the tab that you would like to add a subpage to by clicking on the blue “Add Subpage” button associated to that navigation tab.
  5. Select “Content Page” for the “Subpage Type”. Note that the “Name” is the title that will appear on the page and the “Navigation Text” is the heading that will appear under the page you have selected in the blue menu tab on your club’s webpage. It is up to you if you wish to have the “Name” and “Navigation Text” have the same title.
  6. Once you have filled out the Name, Navigation Text and Page Content click the red “Add Subpage” button.


  7. To view the subpage you just added to a navigation tab, go to your club homepage by clicking on “Club” on the top right-hand side of your screen and put your mouse over top of the navigation tab that you just added a subpage to.


  8. You will see the subpage appear as a drop down that can be clicked on.

Add a PDF or Word document to a navigation tab/subpage

  1. Sign-in to your Courtside Canada account and click on “Admin” on the top of your screen.
  2. Click on the “Settings” tab on the far right-hand side of the blue menu items.
  3. Click on “Navigation Tabs” which is the last tab on the left-hand side of your screen that appears in blue then click on the blue “Navigation Tabs” button.
  4. Choose the tab that you would like to add a PDF or Word document to and then click the blue “Add Subpage” button associated to that navigation tab. You will then see the page below.


  5. You will need to change the ‘Subpage Type” from “Content Page” to “File Upload”. The page below will appear.


    Note that the “Name” is the title that will appear in list of navigation tabs and the “Navigation Text” is the heading that will appear under the page you have selected to add the PDF/Word document to in the blue menu tab on your club’s webpage.
  6. Select the “Choose File” button to find the file that you are wanting to upload. Then click “Add Subpage” as you will be taken back to the list of navigation tabs.
  7. To see how the uploaded document will appear click on “Club” on the top right-hand side and set your mouse over the navigation tab that you attached/uploaded a document to. The attached/uploaded document will appear just like a subpage does - as a drop down item. See example below.

More "how to" info will be posted very soon.

How to add new menu tabs

Here are more suggestions on how to make Courtside Canada a better online home for your tennis club. In this article we show you how to add new menu tabs to your club's website on Courtside Canada.

The menu tab that we will be creating will appear in the blue menu area below the club name (see image below). This menu tab will be visible by club members that have access to your site.


  1. Sign-in to your Courtside Canada account and click on “Admin” on the top of your screen.
  2. Click on the “Settings” tab on the far right-hand side of the blue menu items.
  3. Click on “Navigation Tabs” which is the last tab on the left-hand side of your screen that appears in blue.
  4. You will then be taken to the screen shown below. Click on the “Add Tab” button that appears in the top right-hand corner of your screen.

  5. You will then be taken to a new navigation tab that you can create from scratch.

  6. First you will have to select which Subpage Type you would like to create. By selecting “Content Page” you are creating a new tab that will appear in the blue menu on the homepage of your club’s webpage.

    Tip: The new tab you create will be added to the far right-hand side of your blue menu (it will appear last on the menu bar). You should create menu tabs in the order you wish them to be seen on the menu area.
  7. Select “Content Page” and provide a name and navigation text for your new page. The “Name” is the title that will appear on the page and the “Navigation Text” is the heading that will appear in your blue menu tab for your club’s webpage. The “Name” and “Navigation Text” title does not have to be the same. See example below.

  8. Fill in the page content with the content that you want to make visible to club members and format it accordingly.
  9. Click “Add Subpage” to add the page as a navigation tab that will appear in your blue menu on your club’s webpage. You will then see the page below.

  10. Note where your new page has been added to the list of navigation tabs. In our example the new page added is called “Court Bookings”. Also note where your new page has been added to your club’s blue menu. In our example the new tab is called “Club Rules”.
  11. To edit the page further click on “edit” to view the page as your members would view it, and then click on “Court Bookings” (which appears in blue).
  12. By clicking on “Court Bookings” you will be able to view how the page will appear in the blue menu on your club’s homepage. If the page does not appear as you want it to appear, or if you wish to make some changes, click on the back button on your web browser or repeat steps 1-3 and then click on the blue “Navigation Tabs” button.
  13. To insure that the tab has been added you can also view it by clicking on “Club” on the top right-hand side of your screen and you should see the new tab added to your blue menu bar.

See also How to edit menu tabs and create subpages.

How to post club news

Here are more suggestions on how to make Courtside Canada a better online home for your tennis club. In this article we show you how to create or edit club news.
  1. First sign-in to your Courtside Canada account (your Homecourt will be visible)

  2. Click on “Admin” on the top of the screen
  3. Click on “News” in the blue menu bar and the page below should open on your screen

  4. Create a headline for your news article and type in all content in the “text” box that you would like to have appear in the body of your news article.
  5. Use the formatting tools at the top of the text box to create the look and layout that you want.
  6. Add a photo that you would like to attach to this news article (you don’t have to) then click “Submit Story”
  7. You will then be prompted to add another news article (If you want to). You should see the news article that you just posted on the right-hand side. To view this article click on it. If the formatting does not look right click the back button on your browser and then click “edit” under your news article headline.
  8. To view the news article you just created (as if you were a member of the club) click on “Club” on the top of the screen to be taken to your club’s homepage. To see the news article just added scroll down the screen on the homepage.
  9. To see the full news article click on the blue headline to the right.
See also How to add new menu tabs.

How to add club contact info

Here are more suggestions on how to make Courtside Canada a better online home for your tennis club. In this article we show you how to add or update you club contact information.
  1. First sign-in to your Courtside Canada account (your Homecourt will be visible)

  2. Click on “Admin” on the top of the screen
  3. Click on “Settings” in the blue menu bar on the far right hand side and the Club Details page should appear on your screen.

  4. Click on “Club Contacts”
  5. Input the names (if you want them to be visible on your webpage) and the contact title and contact info for executive staff, volunteers, court attendants at your club.
  6. Click “Update Key Contacts” at the bottom of the screen.

  7. A Message stating “Your Changes have been saved!” should appear.
  8. To view club contacts click on “Club” at the top of your screen and then click on “Upcoming Events” in the blue menu bar. The list of your contacts for event information should appear on the right-hand side of your screen.

See also How to post club news.

How to add your club details

Here are some suggestions on how to make Courtside Canada a better online home for your tennis club, starting with how to add or update your club details (phone number, address, email address).
  1. First sign-in to your Courtside Canada account (your Homecourt will be visible)

  2. Click on “Admin” on the top of the screen
  3. Click on “Settings” in the blue menu bar on the far right hand side and the Club Details page should appear on your screen.


  4. Input all information you want to make available to members on your club’s webpage and click “Update Club details” at the bottom of the screen.
  5. A Message stating “Your Changes have been saved!” should appear.
  6. Click on “Club” on the top right-hand side of your screen and the information you added should appear under your club name.

    .
See also How to add club contact info.

Club setup checklist

Before you get started with setting up your club website on Courtside Canada, we suggest you first consider what information you will want to publish on the Internet. Here are some suggestions on the type of information you may want to collect prior to setting up your Courtside Canada club account:
  1. Club name to be displayed
  2. Club location details, such as address, phone number, contact email address, and brief explanation of where the club is located
  3. List of club executives (president, vice-president, secretary, treasurer etc...) and their contact information
  4. Club policies and rules
  5. Recent club newsletter
  6. Club membership options
  7. List of scheduled club events (social, tournaments, opening day, etc.)
  8. Related images that can be posted to promote your club
  9. Spreadsheet list of members to be imported into member management module.